Introduction
Have you ever wired a LED Strip Dimmable Power Supply but still faced flicker or dimming failure? Many problems come from incorrect matching or wiring steps.
In this article, you will learn how to wire it properly, understand compatibility, and avoid common installation mistakes.
Understanding LED Strip Dimmable Power Supply Basics
What Is a Dimmable LED Power Supply?
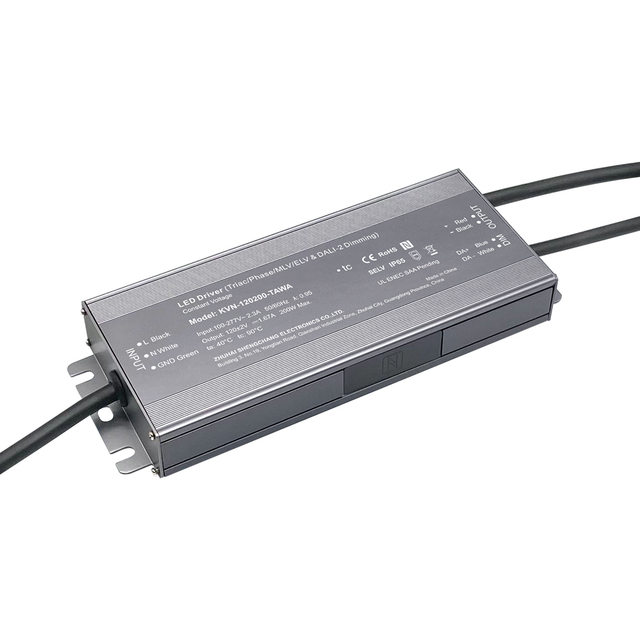
A dimmable LED power supply, often called a dimmable LED driver, controls both power delivery and brightness levels. It converts AC input into stable DC output while allowing brightness adjustment through a compatible dimming system. In LED strip applications, it becomes the core component that ensures smooth and responsive lighting control instead of simple on/off switching.
Unlike standard power supplies, a LED Strip Dimmable Power Supply integrates dimming functionality directly into the circuit design. Standard drivers only provide fixed output, so brightness cannot be adjusted. A dimmable version responds to external signals such as TRIAC or 0-10V, enabling gradual light changes and better user control.
Dimming capability matters because users expect flexibility in modern lighting. It improves comfort in residential spaces and supports energy-saving strategies in commercial projects. In real installations, it also helps match lighting levels to different scenes without replacing hardware.
Constant Voltage vs Constant Current for LED Strips
Understanding output type is critical before wiring any LED Strip Dimmable Power Supply. Most LED strip systems use constant voltage, typically 12V or 24V. These strips contain built-in resistors, so they rely on stable voltage instead of controlled current.
Constant current drivers work differently. They regulate current precisely and adjust voltage automatically. They are usually used for high-power LEDs, modules, or COB lighting where current stability is more important than voltage consistency.
Here is a practical comparison to help you choose correctly:
| Type | Typical Output | Common Applications | Wiring Impact |
| Constant Voltage | 12V / 24V | LED strips, tape lights | Simple parallel wiring |
| Constant Current | Fixed current (e.g., 350mA) | LED modules, downlights | Series wiring required |
Choosing the wrong type can create immediate issues. If a constant current driver is connected to a voltage-based LED strip, the strip may overheat or fail quickly. If a constant voltage supply is used for current-driven LEDs, brightness becomes unstable and lifespan drops.
What to Check Before Wiring a Dimmable LED Power Supply
Wiring an LED Strip Dimmable Power Supply starts long before connecting wires. Most installation problems come from poor preparation, not wiring mistakes. If we check compatibility, load, and safety early, the system works smoothly and avoids rework later.
Matching LED Strip and Power Supply Specifications
Before wiring, we need to confirm the LED strip and power supply match in voltage, power, and type. This step directly affects stability and lifespan. A mismatch can cause flicker, overheating, or complete failure.
Here are the key checks you should always complete:
Voltage matching is the first priority
LED strips usually operate at 12V or 24V. The power supply must output the exact same voltage. If it does not match, the strip may burn out or fail to light. Always check the label on both products before installation.
Power calculation requires margin, not exact match
Add up total wattage of the LED strip. Then multiply by 1.2 to create a safety margin. This keeps the driver running at about 80% load, which improves efficiency and reduces heat buildup.
Driver type must match LED application
LED Strip Dimmable Power Supply units are typically constant voltage. Using a constant current driver for strip lighting leads to unstable brightness or damage. Always confirm the output type clearly.
A quick reference table helps simplify the decision:
| Parameter | What to Check | Why It Matters |
| Voltage | 12V or 24V must match exactly | Prevents damage or failure |
| Power Load | Total wattage × 1.2 | Ensures stable operation |
| Output Type | Constant voltage for LED strips | Avoids wiring issues |
| Application Fit | Strip vs module compatibility | Improves performance |
Manufacturers like Suretron design their LED Strip Dimmable Power Supply range mainly for standard strip voltages, so matching becomes easier during selection. It reduces guesswork during installation.
Confirming the Dimming System Compatibility
Dimming compatibility is often overlooked, but it directly affects whether the system will dim at all. Even if wiring looks correct, the system may fail if the dimmer and driver do not match.
Different dimming methods require different wiring structures and signal types:
TRIAC dimming works on the AC input side
It adjusts voltage by cutting the waveform. This method is common in residential setups. It is simple but requires compatible drivers.
0-10V dimming uses low-voltage control wires
It requires two additional signal wires. The driver reads voltage changes to adjust brightness. It is widely used in commercial projects.
DALI and digital systems use communication protocols
They allow advanced control, grouping, and automation. Wiring includes dedicated communication lines instead of simple analog signals.
When checking compatibility, focus on these points:
The dimmer and power supply must use the same protocol
Labels on the driver usually indicate supported dimming types
Wiring diagrams show terminal connections clearly
Mixing systems leads to flicker, no dimming, or unstable output
Suretron supports multiple dimming protocols across its product range, so users can select a matching system based on project needs instead of forcing compatibility later.
Safety Precautions Before Installation
Safety is not optional when working with an LED Strip Dimmable Power Supply. Even small mistakes can lead to electrical hazards or equipment damage. Taking a few minutes to prepare properly reduces risk significantly.
Before starting any wiring, follow these steps carefully:
Turn off power at the breaker, not just the switch
It ensures no live current remains in the circuit. Always verify using a voltage tester before touching wires.
Use proper tools and insulated materials
Wire strippers, insulated screwdrivers, and correct connectors improve connection quality. Loose or exposed wiring can cause short circuits.
Plan the wiring layout before installation
Think about cable routing, ventilation space, and driver placement. A well-planned layout prevents overheating and makes maintenance easier later.
When using products from experienced manufacturers like Suretron, installation guides and terminal labels are usually clear and consistent. It helps reduce wiring errors and improves overall safety during setup.
Step-by-Step Wiring Guide for LED Strip Dimmable Power Supply
Wiring an LED Strip Dimmable Power Supply becomes much easier when we follow a clear sequence. Each step builds on the previous one, so skipping details often leads to flicker or failure. We will go through input, output, and dimming connections in a practical order.
Step 1 – Identify Input, Output, and Dimming Terminals
Before touching any wire, we need to clearly identify all terminals on the power supply. Most dimmable LED drivers follow a similar labeling system, but details can vary slightly depending on the model.
Here is how to read the terminals correctly:
AC Input terminals (L, N, ⏚)
L stands for Live, N stands for Neutral, and the ground symbol represents Earth. These connect to the main power source. Mixing them incorrectly may cause safety risks or driver failure.
DC Output terminals (+V, -V)
These connect directly to the LED strip. Polarity matters here. Reversing + and - will prevent the strip from lighting or damage components over time.
Dimming control terminals (DIM+, DIM-, DA, DA-)
These are used only when the driver supports external dimming control. The naming depends on the protocol, such as 0-10V or DALI.
A quick overview helps simplify identification:
| Terminal Type | Label Example | Function |
| AC Input | L / N / Ground | Receives mains power |
| DC Output | +V / -V | Powers LED strip |
| Dimming Control | DIM+, DIM-, DA | Controls brightness |
Take a moment to read the label on the driver housing. Manufacturers like Suretron usually print clear terminal markings, which helps reduce confusion during installation.
Step 2 – Connect AC Input Power Safely
Now we connect the power supply to the mains. This step requires extra attention because it involves high voltage. Safety and correct wiring both matter here.
Follow these key points during connection:
Connect Live and Neutral to correct terminals
Match the live wire to L and neutral wire to N. Tighten screws properly to avoid loose contact, which can cause overheating or flicker.
Always connect the ground wire
Grounding improves safety and protects both the driver and the user. Skipping this step increases risk in case of electrical faults.
Turn off power before working
Never rely on a wall switch. Use the breaker and confirm there is no current before touching wires.
Common mistakes to avoid:
Swapping live and neutral connections
Leaving exposed copper outside terminals
Using wires that are too thin for the load
In real projects, stable AC input ensures the LED Strip Dimmable Power Supply performs consistently. Poor input wiring often leads to unstable dimming or driver shutdown.
Step 3 – Connect LED Strip to DC Output
Once the input side is secure, we move to the low-voltage output. This part powers the LED strip directly, so correct polarity and connection quality are critical.
Key steps for this connection:
Match polarity carefully (+ to +, - to -)
LED strips are polarity-sensitive. Reversed wiring will stop the strip from working immediately.
Ensure tight and clean connections
Loose terminals cause flickering or intermittent lighting. Secure connections improve long-term reliability.
Consider voltage drop in long runs
Long LED strips may lose brightness at the far end. To avoid this, use thicker wires or inject power at multiple points.
Step 4 – Connect the Dimming Control System
The final step is connecting the dimming system. This step depends entirely on the dimming method used, so understanding the protocol is essential.
Different dimming methods require different approaches:
TRIAC dimming (phase-cut)
The dimmer is installed on the AC input side. It adjusts the waveform before power reaches the driver. No extra control wires are needed.
0-10V dimming
Requires two additional control wires, usually labeled DIM+ and DIM-. The dimmer sends a low-voltage signal to adjust brightness gradually.
DALI or DMX systems
These use digital communication lines. They allow advanced control, grouping, and automation, but require correct bus wiring.
Important differences between power wiring and dimming wiring:
Power wiring carries energy to the LED strip
Dimming wiring carries control signals only
Mixing these connections can damage the system
Practical tips during this step:
Follow the wiring diagram provided on the driver
Keep control wires separate from high-voltage lines
Test dimming response after connection
Suretron supports multiple dimming protocols in its LED Strip Dimmable Power Supply range, which gives flexibility when selecting control systems. It also means installers must carefully match wiring methods to the selected dimming type to ensure smooth performance.
Troubleshooting & Best Practices for Stable Dimming Performance
Common Wiring Problems and How to Fix Them
When something goes wrong, the symptoms usually appear clearly. The key is to connect each symptom to its root cause instead of guessing randomly.
Here are the most frequent problems and what they usually mean:
LED strip not lighting up at all
This often happens when polarity is reversed or AC input is not connected correctly. Sometimes the driver is incompatible with the LED strip voltage. Always recheck input wiring, output polarity, and voltage rating before replacing components.
Flickering or unstable dimming
Flicker usually indicates a mismatch between the dimmer and the LED Strip Dimmable Power Supply. It may also come from loose connections or operating the driver near its maximum load. Reducing load or switching to a compatible dimming system often solves the issue.
No response from dimmer control
If brightness does not change, the dimming signal may not reach the driver. Incorrect wiring on DIM terminals or using the wrong dimming protocol can cause this. Checking labels and wiring diagrams helps identify the issue quickly.
How to Prevent Flicker and Compatibility Issues
Preventing problems is always easier than fixing them later. A stable LED Strip Dimmable Power Supply system depends on correct selection and balanced operation from the beginning.
Focus on these key prevention strategies:
Choose the correct driver for the application
Always match voltage and dimming protocol. A 24V LED strip needs a 24V constant voltage driver. Mixing specifications leads to unstable performance and early failure.
Avoid overload and underload conditions
Running the driver at full capacity creates heat and flicker. Very low load can also affect dimming accuracy. Keep the load around 70–80% of rated power for best results.
Ensure dimmer and driver compatibility
Not all dimmers work with all drivers. TRIAC dimmers require TRIAC-compatible drivers. 0-10V systems require dedicated control terminals. Matching these correctly prevents most dimming issues.
A quick compatibility checklist:
| Check Item | What to Confirm | Result |
| Voltage Match | 12V or 24V alignment | Stable output |
| Load Range | Within 70–80% capacity | Reduced flicker |
| Dimming Protocol | Same system on both sides | Smooth dimming |
Installation Tips for Long-Term Reliability
Long-term performance depends not only on wiring but also on installation conditions. Small improvements during setup can extend system lifespan significantly.
Here are practical tips used in real projects:
Ensure proper ventilation and heat dissipation
LED drivers generate heat during operation. Installing them in enclosed spaces without airflow can reduce efficiency and shorten lifespan. Leave enough space around the unit for cooling.
Use certified and high-quality components
Low-quality drivers or connectors may fail under load. Certified products provide better safety and stable output over time. This is especially important in commercial or continuous-use environments.
Plan wiring layout carefully for larger systems
In long LED strip runs, voltage drop becomes a serious issue. Using thicker cables or multiple power injection points helps maintain consistent brightness across the strip.
Additional practical considerations:
Keep wiring organized to simplify maintenance
Separate signal wires from power cables to reduce interference
Secure all connections to prevent vibration-related failures
Conclusion
Wiring a dimmable LED power supply needs careful steps and correct matching. We check voltage, load, and dimming type first. Then we wire input, output, and control lines safely. Proper setup prevents flicker and improves stability. Suretron offers reliable LED Strip Dimmable Power Supply solutions. They support multiple dimming systems and stable output, helping users achieve smooth and efficient lighting.
FAQ
Q: What is an LED Strip Dimmable Power Supply?
A: A LED Strip Dimmable Power Supply converts AC to DC and allows brightness control. It works with dimmers to adjust light levels smoothly. It is essential for flexible LED strip lighting setups.
Q: How do you wire an LED Strip Dimmable Power Supply step by step?
A: First connect AC input to L and N. Then connect DC output to the LED strip with correct polarity. Finally connect the dimming control wires. This ensures the LED Strip Dimmable Power Supply works correctly.
Q: Why is my LED Strip Dimmable Power Supply flickering?
A: Flickering usually happens due to overload, loose wiring, or incompatible dimmers. Check load levels and connections carefully. A properly matched LED Strip Dimmable Power Supply reduces flicker.
Q: Can I use any dimmer with an LED Strip Dimmable Power Supply?
A: No, not all dimmers are compatible. The dimmer must match the driver type like TRIAC or 0-10V. Using the right LED Strip Dimmable Power Supply ensures smooth dimming performance.
Q: How do I choose the right LED Strip Dimmable Power Supply?
A: Match voltage, wattage, and dimming method with your LED strip. Keep load around 70–80% of capacity. A suitable LED Strip Dimmable Power Supply improves safety and long-term reliability.


